I thought I better write an article about how I’ve put this blog together. I’ll give a brief summary of the technologies I use, why I use them, and then go through the basic steps I’ve followed to put it all together.
Technologies
I’m using Wyam to generate the blog because there is a lot of positive buzz around it, and I was interested in using a static site generator built in C#. Since I am comfortable in C#, and Wyam is still a young project it felt like a good opportunity for me to start contributing to the open source community.
For source control I’m using Visual Studio Team Services, because they offer unlimited free private repositories.
Everything is hosted in Azure because I get so many Azure credits through work that I don’t know what to do with them. There are plenty of other options such as Github Pages, but chances are if you are checking out this blog post you are in the same boat as me.
Steps
Now I’ll go through the process of creating and deploying the blog. Some aspects of the process are covered much better by other articles, and in those cases I’ll be linking you in that direction.
Create the Wyam site
Wyam can be downloaded from the Wyam site. I highly suggest following the instructions under “Obtaining” in the “Usage” section. With Wyam installed, navigate a local directory for your blog and run the following command:
wyam new -r Blog
This tells Wyam to create a new blog in the current directory using the blog template.
Blog posts themselves are stored in the input/posts/ directory, and are created using markdown.
The way to learn how to set up your site will be checking out some open source blogs written in Wyam, or to check some examples put together by Dave Glick
You can compile your blog by running the following command:
wyam -r Blog -t CleanBlog -p -w
I’ll now quickly explain the parameters. -r tells it to use the Blog recipe. -t tells it which theme to use. In this case, I’m using CleanBlog.
The -p tells it to host it locally where it can be found at http://localhost:5080/ by default.
Lastly -w tells it to watch for any changes in the posts directory, or the config.wyam file, when a change occurs it will compile everything again.
Create a file in the base of the directory and call it config.wyam.
In this file you put the following:
GlobalMetadata["Title"] = "<Your blogs title>";
GlobalMetadata["Description"] = "<You blog's description>";
GlobalMetadata["Intro"] = "<Small blurb about your blog>";
When your blog re-compiles you should see the changes appear on the main page.
Those were the basics for setting up the blog itself, now lets improve our workflow by adding a build tool.
Set up Cake
Cake is an automation build tool, we are able to use it to build our blog from the command-line using simple commands. In the future we are going to be able to use these same commands to get our blog compiled and ready for Azure from source control. If you feel more comfortable you can follow the official Cake tutorial, but some of my later steps will assume you have a build.cake file looking like mine bellow.
We need two files to get Cake up and running, the first is build.cake.
Create this file in the root directory of your blog, and put the following code into it:
#tool nuget:?package=Wyam&prerelease
#addin nuget:?package=Cake.Wyam&prerelease

//////////////////////////////////////////////////////////////////////
// ARGUMENTS
//////////////////////////////////////////////////////////////////////

var target = Argument("target", "Default");

//////////////////////////////////////////////////////////////////////
// TASKS
//////////////////////////////////////////////////////////////////////

Task("Build")
    .Does(() =>
    {
        Wyam(new WyamSettings
        {
            Recipe = "Blog",
            Theme = "CleanBlog",
            UpdatePackages = true
        });
    });

Task("Preview")
    .Does(() =>
    {
        Wyam(new WyamSettings
        {
            Recipe = "Blog",
            Theme = "CleanBlog",
            UpdatePackages = true,
            Preview = true,
            Watch = true
        });
    });

//////////////////////////////////////////////////////////////////////
// TASK TARGETS
//////////////////////////////////////////////////////////////////////

Task("Default")
    .IsDependentOn("Preview");

//////////////////////////////////////////////////////////////////////
// EXECUTION
//////////////////////////////////////////////////////////////////////

RunTarget(target);
This sets us up with two basic tasks. Our Build task will just build the blog using the CleanBlog theme. The Preview task will build the blog, watch the files, and create a localhost instance for you to view it in. By default it runs the “Preview” task. The code I’m using is this file is a striped down version of the one used for Dave Glick’s blog.
Next you will need to download the powershell file build.ps1 from the example repository.
If you are getting stuck I recommend checking out the Cake getting started page now.
The build.ps1 powershell file is a way of interfacing with Cake in a clean way. It will make sure we have Cake downloaded and then run the default task set up in your build.cake file.
If you want to run the “Build” task you can do so by running .\build.ps1 -target Build instead.
So now we have some build automation set up, lets get this all into source control.
Commit it to source control
If you haven’t already, you now want to create a Visual Studio Team Services account, and a a Visual Studio Team Services project. Create a new git repository in this project, and commit your code to it. There are some great git tutorials made by both Atlassian and GitHub. VSTS can integrate with many source control providers, but for the sake of having everything in one place I’m storing mine here.
You want to avoid committing anything in the output or tools directories to source control.
Files in these folders are downloaded or generated automatically, which means we gain very little by tracking their changes, because any changes to these files will be the result of changes in our source files.
You can create a .gitignore file and give it the following contents to tell it not to track those folders:
#Ignore tools
tools/*
#Ignore output files
output/*
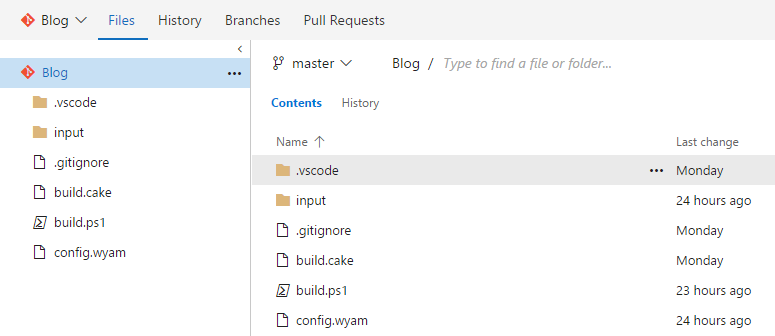
Your source control now look similar to below, which means it’s time to set up continuous integration!
Set up continuous integration
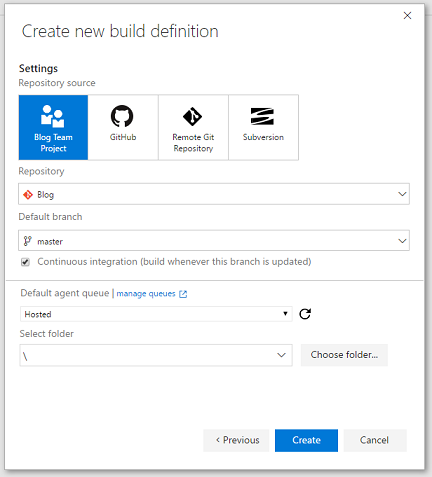
Navigate to the build tab of your VSTS project and click the “+ New” button in the top right hand corner. This will create a pop up with a range of pre-set build options. We are going to be creating our own from scratch, so double click the “Empty” option at the bottom of the pop-up. This will bring you to the following screen, here you want to select your project in source control, and tick the continuous integration box.
When you click create you will be greeted with a fairly blank looking screen with the option to add build steps. We will be added two build steps here:
- Compile our blog using Cake
- Take the output and store it in a shared place where it can be picked up for release
Cake is not a default option in the task catalog, so we need to add it by clicking the “Add build step” button, and then clicking the link at the bottom prompting you to check out the market place. Here you want to search for Cake, open it up, and click install. Now when we go back to the new build step screen, you can select Cake as an build step option. After selecting Cake you want to change the target from “Default” to “Build”. Our default option is perfect when we are developing our blog, but when it comes to CI, all we eed is for it to be built.
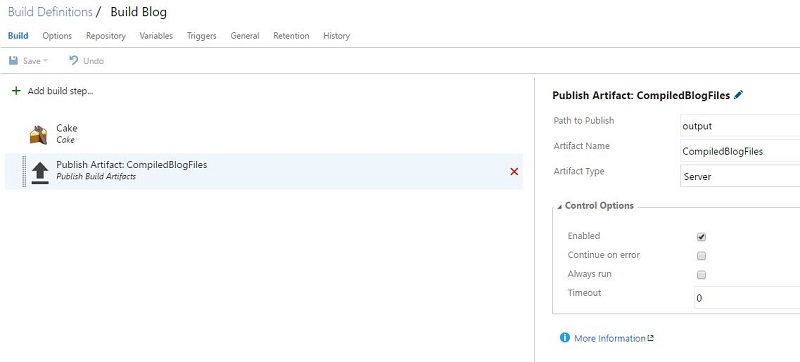
You now want to add the “Publish Build Artifacts” build step, which can be found in the “Utility” section of the “Add build step” pop-up. Get your input looking like the image below and you will be ready to go.
Click the “Queue new build” button at the top left of the screen, and it will run through these newly created steps on the source code. Now that we’ve got this set up, you will need to create an Azure instance for you to deploy to.
Create an Azure instance
Microsoft have great documentation on how to creating an Azure App Service. Make sure that you link your VSTS account and Azure account, so that they can find each other.
Set up continuous deployment
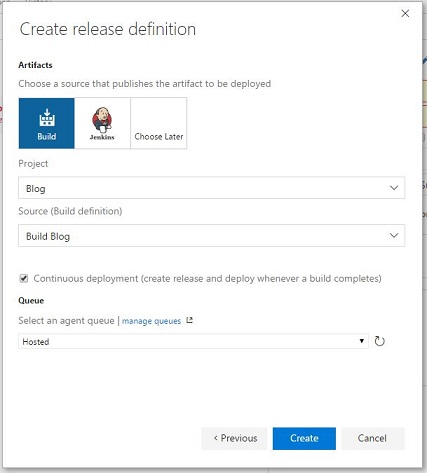
Last of all we create the Release definition. Navigate to the Releases tab of the “Build and Releases” screen, click the little green plus you can see in the top left, and “Create release definition”. We are deploying to an Azure App Service instance, so we can just select the top open in the pop-up. On the following screen, select our build definition like the image below. Make sure that you check the “Continuous deployment” checkbox. By doing this, our blog will always have the latest changes.
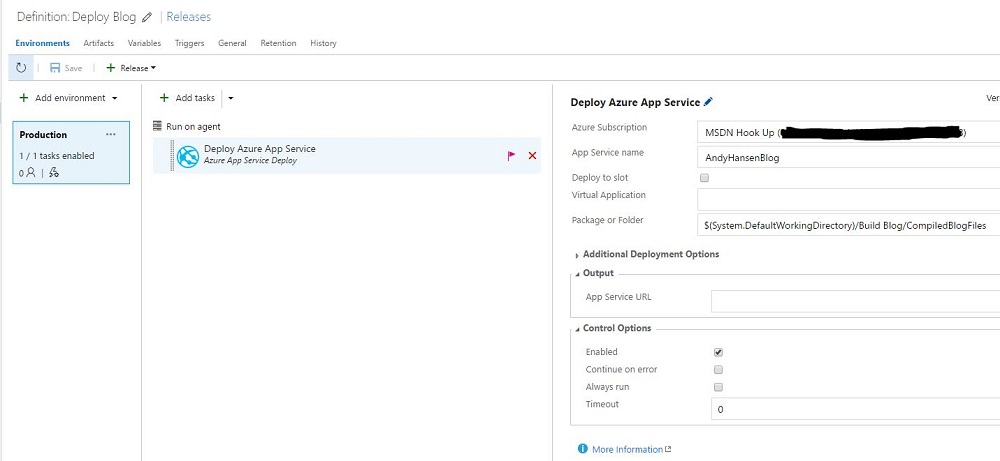
Hit create and fill out the details on the screen to the right. If your VSTS and Azure account are linked correctly, you will be able to select your subscription and service name from the top two dropdowns. If they do not appear, then revisit the information I’ve put into the “Create an Azure instance section”. You will need to change the value of “Package or folder” to be the output folder created by our build definition. Click the button with the ellipses in it beside the field, and select out “CompiledBlogFiles” folder.
Your screen should now be looking like the image below.
Now that everything is set up, you can queue up a new release by clicking the “+ Release” button, then clicking on the Create button on the pop-up. This will build your blog with the current source code, and release it to your selected Azure environment. We’ve told the release definition to use continuous deployment, and our build definition to use continuous integration, so anytime we commit new content to our blog it will be deployed to Azure. If this doesn’t sound ideal, you can always go back into those definition and uncheck those options.
Done!
That’s a wrap! I’m still very much learning this blogging thing, so any comments would be greatly appreciated. I realise there is plenty of improvements to be made, and I’d love to get your input on where I can make the most impact. Cheers!